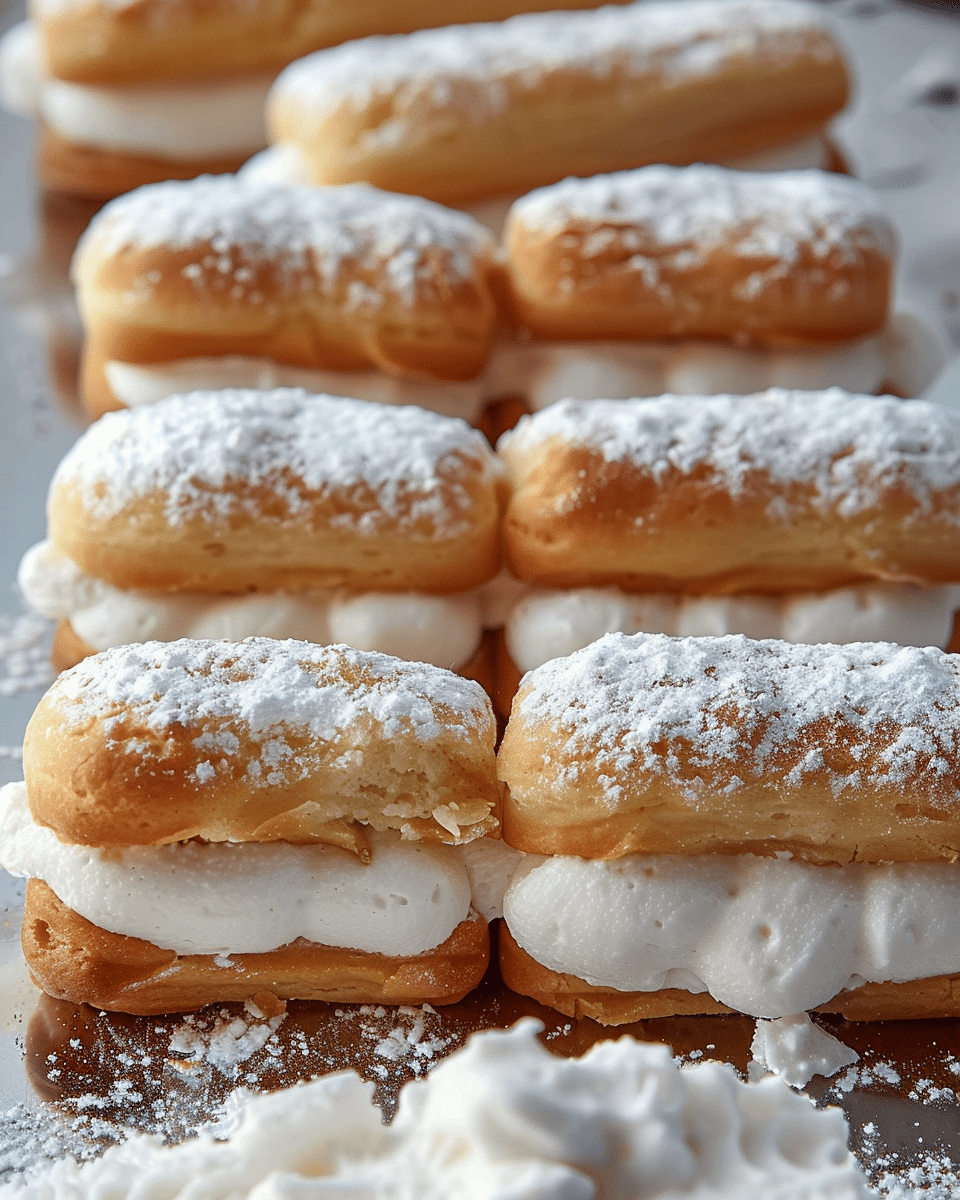
Homemade Twinkies bring back a wave of sweet nostalgia while delivering a far more flavorful, fresh, and satisfying experience than the store-bought version ever could. I love how these golden sponge cakes strike the perfect balance between light, fluffy texture and creamy, velvety filling. Every bite melts in my mouth, and I can’t help but feel a touch of childhood joy mixed with the pride of having made them from scratch.
Why You’ll Love This Recipe
I adore how this recipe captures the essence of the classic Twinkie while elevating it to a whole new level. The cakes bake up soft, golden, and tender, with a luscious cream filling that’s perfectly sweet and cloud-like. I find that using real butter, pure vanilla, and marshmallow fluff gives a richer, more authentic flavor that instantly wins hearts. Plus, it’s incredibly fun to make—I always feel accomplished when I see those beautifully filled cakes lined up, ready to enjoy or share.
Ingredients
(Tip: You’ll find the full list of Ingredients and measurements in the recipe card below.)
For the Golden Sponge Cakes:
1 ½ cups all-purpose flour, sifted multiple times
1 ½ teaspoons baking powder
½ teaspoon salt
½ cup unsalted butter, softened
1 cup granulated sugar
3 large eggs, separated
1 teaspoon pure vanilla extract
½ cup whole milk, at room temperature
For the Creamy Vanilla Filling:
½ cup unsalted butter, softened
½ cup vegetable shortening
1 teaspoon pure vanilla extract
½ teaspoon salt
4 cups powdered sugar, sifted
7 ounces marshmallow fluff
2-3 tablespoons whole milk or heavy cream, as needed
Directions
I start by preheating the oven to 350°F (175°C) and greasing the Twinkie molds well. In a bowl, I whisk together the flour, baking powder, and salt, then set that aside.
In a stand mixer, I cream the butter and sugar until it’s light and fluffy, about 3-5 minutes. I beat in the egg yolks one at a time, followed by vanilla extract. Then, alternating between dry ingredients and milk, I mix everything just until combined.
In another clean bowl, I whip the egg whites until stiff peaks form. Gently, I fold one-third of the egg whites into the batter to lighten it, then carefully fold in the rest, making sure not to deflate the mixture.
I spoon the batter into the prepared molds, filling each about two-thirds full, and bake for 12–16 minutes or until golden brown and springy. After cooling for a few minutes in the molds, I transfer them to a wire rack to cool completely.
To make the filling, I beat softened butter and shortening together until fluffy, then add vanilla and salt. Gradually, I mix in powdered sugar, beating until light and airy. I add the marshmallow fluff and mix until smooth, adjusting the texture with a bit of milk or cream.
I fill a piping bag fitted with a long, thin tip, create three small holes on the bottom of each cooled cake, and fill them evenly with the creamy mixture. For the best texture, I chill the Twinkies for about 30–60 minutes before serving.
Servings and Timing
Prep Time: 45 minutes
Cook Time: 15 minutes
Total Time: 1 hour
Servings: 12 cakes
Variations
I enjoy experimenting with different flavors. Sometimes, I replace vanilla extract with almond or add a pinch of lemon zest for brightness. When I’m in the mood for something indulgent, I stir in cocoa powder to make a chocolate cream filling or mix in a spoonful of peanut butter for a salty-sweet twist. For the holidays, I’ve even added peppermint or pumpkin spice for a festive flair.
Storage/Reheating
I store my Homemade Twinkies in an airtight container at room temperature for 2–3 days or refrigerate them for up to a week. Before serving, I like to let refrigerated cakes sit at room temperature for about 15 minutes to soften the filling. When I make extra, I wrap them individually and freeze them for up to a month—they thaw beautifully at room temperature.
FAQs
How can I make Twinkies without a special mold?
I often use mini loaf pans or even foil boats shaped around a spice bottle as a substitute. They won’t look identical, but the taste is just as amazing.
Can I use margarine instead of butter?
I prefer butter for its rich flavor, but margarine can work if that’s what I have on hand—just expect a slightly different taste and texture.
Why did my cakes turn out dense?
This usually happens when the batter is overmixed after adding flour or when egg whites aren’t folded gently enough. I always fold with patience to keep the batter airy.
What’s the best way to pipe the filling evenly?
I use a long piping tip (like a Bismark tip) and insert it deep into the cake, squeezing gently as I pull it out. It takes a little practice, but it fills perfectly after a few tries.
Can I flavor the filling differently?
Absolutely! I sometimes add coffee extract, caramel sauce, or even crushed freeze-dried strawberries for a fun twist.
Conclusion
Making Homemade Twinkies is one of those delightful kitchen adventures that always brings a smile to my face. The combination of fluffy sponge cake and rich, creamy filling is pure nostalgia made better. I love how the aroma fills the kitchen and how each bite feels like a taste of the past, only fresher and more decadent. Whether I serve them at a party or simply enjoy one with coffee, they never fail to impress. Once I made these from scratch, I knew there was no going back—the homemade version truly outshines the original.
These Homemade Twinkies are fluffy golden sponge cakes filled with a luscious vanilla marshmallow cream. They’re a nostalgic treat made even better with fresh ingredients and a tender homemade touch.
Total Time:1 hour
Yield:12 cakes
Ingredients
For the Golden Sponge Cakes:
1 ½ cups all-purpose flour, sifted
1 ½ teaspoons baking powder
½ teaspoon salt
½ cup unsalted butter, softened
1 cup granulated sugar
3 large eggs, separated
1 teaspoon pure vanilla extract
½ cup whole milk, room temperature
For the Creamy Vanilla Filling:
½ cup unsalted butter, softened
½ cup vegetable shortening
1 teaspoon pure vanilla extract
½ teaspoon salt
4 cups powdered sugar, sifted
7 ounces marshmallow fluff
2–3 tablespoons whole milk or heavy cream, as needed
Instructions
Preheat oven to 350°F (175°C) and grease Twinkie molds or mini loaf pans.
In a bowl, whisk flour, baking powder, and salt. Set aside.
In a mixer, cream butter and sugar until light and fluffy. Beat in egg yolks one at a time, then add vanilla. Alternate adding flour mixture and milk until just combined.
In a separate bowl, whip egg whites to stiff peaks. Fold into the batter in batches to keep the mixture light.
Spoon batter into prepared molds, filling each about ⅔ full. Bake for 12–16 minutes until golden and springy. Cool completely on a wire rack.
For the filling, beat butter and shortening until fluffy. Add vanilla and salt, then gradually mix in powdered sugar. Add marshmallow fluff and beat until smooth. Adjust with milk if needed.
Fill a piping bag fitted with a long tip. Poke three holes in the bottom of each cake and fill with cream. Chill for 30–60 minutes before serving for best texture.
Notes
Don’t overmix the batter to keep cakes light and fluffy.
Use a long piping tip for even filling distribution.
Chill filled cakes to help set the cream and enhance texture.
Flavor the filling with almond, coffee, or fruit extracts for variation.
Use foil molds or mini loaf pans if you don’t have Twinkie pans.


