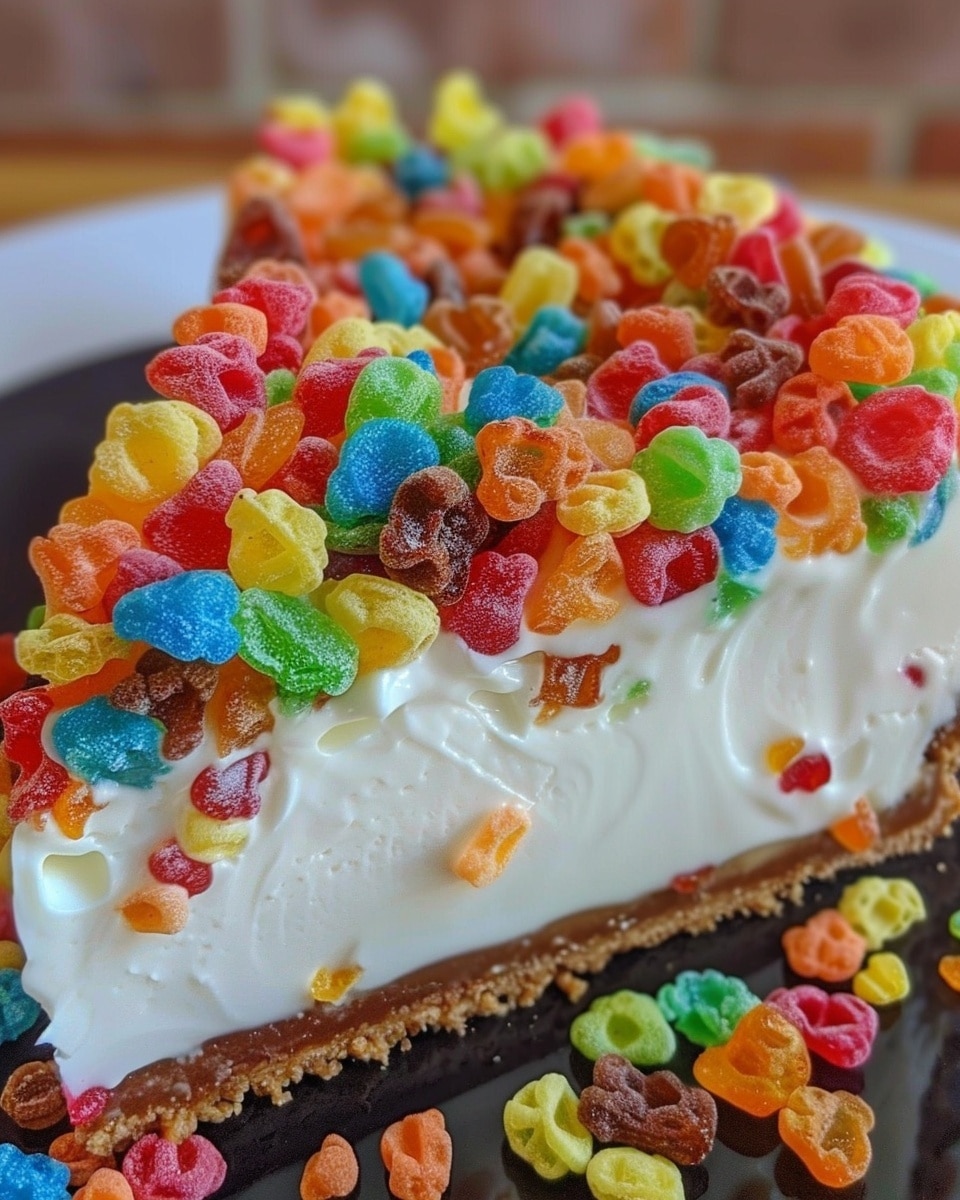
This No-Bake Fruity Pebbles Cheesecake is a colorful, creamy dessert packed with nostalgic cereal flavor and a buttery cookie crust. It’s rich, smooth, and requires no oven time, making it perfect for parties, birthdays, or whenever you want a fun and easy sweet treat.
Why You’ll Love This Recipe
No oven required, making it ideal for warm days
Bright, colorful presentation that stands out on any dessert table
Creamy, smooth cheesecake texture with a delightful cereal crunch
Simple ingredients that are easy to find
Perfect make-ahead dessert for gatherings and celebrations
Kid-friendly and great for special occasions
Ingredients
(Tip: You’ll find the full list of ingredients and measurements in the recipe card below.)
For the crust:
1 cup vanilla wafer cookies, finely ground into crumbs (about 30 wafers)
2 cups Fruity Pebbles cereal, crushed into fine crumbs
½ cup unsalted butter, melted
For the filling:
16 ounces full-fat cream cheese, softened (2 blocks)
½ cup granulated sugar
2 tablespoons heavy whipping cream
1 teaspoon pure vanilla extract
1 cup Fruity Pebbles cereal
Directions
Prepare the crust: In a large bowl, combine the finely ground vanilla wafer crumbs and crushed Fruity Pebbles cereal. Pour in the melted butter and mix until the texture resembles wet sand.
Press the crust: Transfer the mixture into a 9-inch springform pan. Press it firmly and evenly into the bottom of the pan using the back of a spoon or the bottom of a glass. Place the pan in the refrigerator for at least 30 minutes to set.
Make the filling: In a large mixing bowl, beat the softened cream cheese until smooth and creamy. Add the granulated sugar and continue beating until fully incorporated and lump-free.
Add flavoring: Mix in the heavy whipping cream and vanilla extract. Beat until the mixture is smooth and silky.
Fold in cereal: Gently fold in 1 cup of Fruity Pebbles cereal, distributing it evenly throughout the filling.
Assemble the cheesecake: Remove the crust from the refrigerator and spread the filling evenly over the chilled crust. Smooth the top with a spatula.
Chill: Cover and refrigerate for at least 4 hours, or until fully set. For best results, chill overnight.
Serve: Carefully remove the cheesecake from the springform pan, slice, and serve chilled.
Servings and timing
Servings: 8–10 slices
Preparation time: 20 minutes
Chilling time: 4 hours minimum
Total time: Approximately 4 hours and 20 minutes
Variations
Chocolate twist: Add ½ cup mini chocolate chips to the filling for extra texture and flavor.
Extra crunchy topping: Sprinkle additional Fruity Pebbles on top just before serving.
Whipped topping layer: Spread a thin layer of stabilized whipped cream on top before garnishing.
Different cereal base: Replace vanilla wafers with crushed graham crackers for a slightly different crust flavor.
Mini cheesecakes: Divide the crust and filling into lined muffin tins for individual portions.
Storage/Reheating
Store the cheesecake covered in the refrigerator for up to 4 days.
For longer storage, freeze individual slices wrapped tightly in plastic wrap and placed in an airtight container for up to 1 month. Thaw overnight in the refrigerator before serving.
This dessert does not require reheating. Serve chilled directly from the refrigerator for the best texture.
FAQs
Can I use low-fat cream cheese?
Yes, but full-fat cream cheese provides a richer texture and better structure. Low-fat versions may result in a softer filling.
How do I prevent lumps in the filling?
Make sure the cream cheese is fully softened to room temperature before beating.
Can I make this cheesecake ahead of time?
Yes, it’s ideal for making a day in advance since it needs several hours to chill and set.
What size pan works best?
A 9-inch springform pan is recommended for easy removal and clean slices.
Can I freeze the whole cheesecake?
Yes, wrap it tightly in plastic wrap and foil before freezing. Thaw in the refrigerator before serving.
How do I get clean slices?
Use a sharp knife dipped in warm water and wiped clean between each cut.
Can I use a different cereal?
Yes, you can substitute with another colorful or fruity cereal for a similar effect.
Why does my cheesecake seem too soft?
It may not have chilled long enough. Allow additional refrigeration time to firm up completely.
Can I add gelatin to make it firmer?
Yes, a small amount of dissolved unflavored gelatin can be added if you prefer a more stable texture.
How long can it sit out at room temperature?
It’s best not to leave it out for more than 1–2 hours to maintain food safety and texture.
Conclusion
No-Bake Fruity Pebbles Cheesecake is a fun, vibrant dessert that combines creamy cheesecake with nostalgic cereal crunch. With its simple preparation and eye-catching appearance, it’s perfect for celebrations, family gatherings, or whenever you want a colorful treat that everyone will love. Prepare it ahead, let it chill, and enjoy every creamy, crunchy bite.
This No-Bake Fruity Pebbles Cheesecake is a colorful, creamy dessert with a buttery cookie crust and bursts of crunchy cereal throughout. Rich, smooth, and oven-free, it’s perfect for parties, birthdays, and fun make-ahead treats.
Total Time:4 hours 20 minutes
Yield:8-10 slices
Ingredients
1 cup vanilla wafer cookies, finely ground (about 30 wafers)
2 cups Fruity Pebbles cereal, crushed (for crust)
1/2 cup unsalted butter, melted
16 ounces full-fat cream cheese, softened
1/2 cup granulated sugar
2 tablespoons heavy whipping cream
1 teaspoon pure vanilla extract
1 cup Fruity Pebbles cereal (for filling)
Instructions
In a large bowl, combine vanilla wafer crumbs and crushed Fruity Pebbles. Stir in melted butter until mixture resembles wet sand.
Press mixture firmly into the bottom of a 9-inch springform pan. Refrigerate for at least 30 minutes to set.
Beat softened cream cheese in a large bowl until smooth and creamy.
Add granulated sugar and beat until fully incorporated and lump-free.
Mix in heavy whipping cream and vanilla extract until smooth.
Gently fold in 1 cup Fruity Pebbles cereal.
Spread filling evenly over chilled crust and smooth the top.
Cover and refrigerate for at least 4 hours, preferably overnight, until fully set.
Remove from pan, slice, and serve chilled.
Notes
Ensure cream cheese is fully softened to avoid lumps.
Chill overnight for best texture and cleaner slices.
Add extra cereal on top just before serving for added crunch.
Store refrigerated due to dairy content.
Freeze individual slices for up to 1 month if needed.


